壹、前言
讓Arduino撥放MP3或WAV的方式有很多種,如果拿"Arduino MP3 Player"這類關鍵字去餵狗,最大宗的答案莫非是DFPlayer Mini這個小零件,這零件呢可以裝上按鈕獨立使用,亦可被動地接收Serial Port的訊號,使用其他零組件如ESP8266或HC-05/06來控制,當然今天的主題是拿Arduino來做基本控制,就不多談了。
再來,用"Arduino DFPlayer Mini"之類的關鍵字去餵狗,沒錯,是可以得到很多的範例與教程,但是初心者順藤摸瓜後往往沒有頭緒,為什麼play()指令不會執行?為什麼要掛delay()把執行緒卡得死死的?
今天這篇說是基本篇,其實一點都不基本,因為我懶惰...這篇將會直接省略很多DFPlayer的簡介,因為網路上通通都有,寫也是多餘直接講重點。
從基本開始,先用Arduino Uno,等翅膀硬了再去用nano或mini,達到真正迷你化的撥放器(其實大同小異啦,只是先練練身體)。從其他網路資源搜尋後相信心裡應該知道要準備什麼,你會需要:
1. Arduino Uno 一台
2. DFPlayer Mini 一組
3. 低容量的microSD一張,我是拿古早行車紀錄器退下來的Kingston 8GB來玩
4. 1K歐姆電阻一個,接在Arduino 用來TX的腳位可以減少雜音
5. 小喇叭一個,注意不是蜂鳴器(Buzzer)是喇叭 (Speaker ),因為在購物網用Arduino + 喇叭當關鍵字很容易噴出蜂鳴器,千萬不要買錯了,正常喇叭都會標示0.5W 8歐姆之類的規格,買那個才對。
6. 各種杜邦線、電線
電腦方面除了Arduino IDE之外,你還得準備幾首要撥放的mp3,將它們取名為 0001.mp3、0002.mp3等,其名稱開頭一定要是小於256的四碼數字,亦即0001~0255,後面則可以任意加上名稱註解,建議英文比較不會出錯,例如:
0001_The_First_Song.mp3
這格式是可以正常識別的。
將記憶卡格式化成FAT或FAT32格式後把他們裝進去就可以了,坊間有其他教程認為要創建一個叫做mp3的資料夾,然後把音樂放在裡面,我自己都試過,差別在使用的指令不同,都可以正常用。
還有,昏倒十系統已經無法將磁碟格式化成FAT格式了,需要使用如minitool Partition Wizard或EaseUS Partition Master之類的第三方軟體來做。
準備好軟體工作後,要來接硬體的東西了。
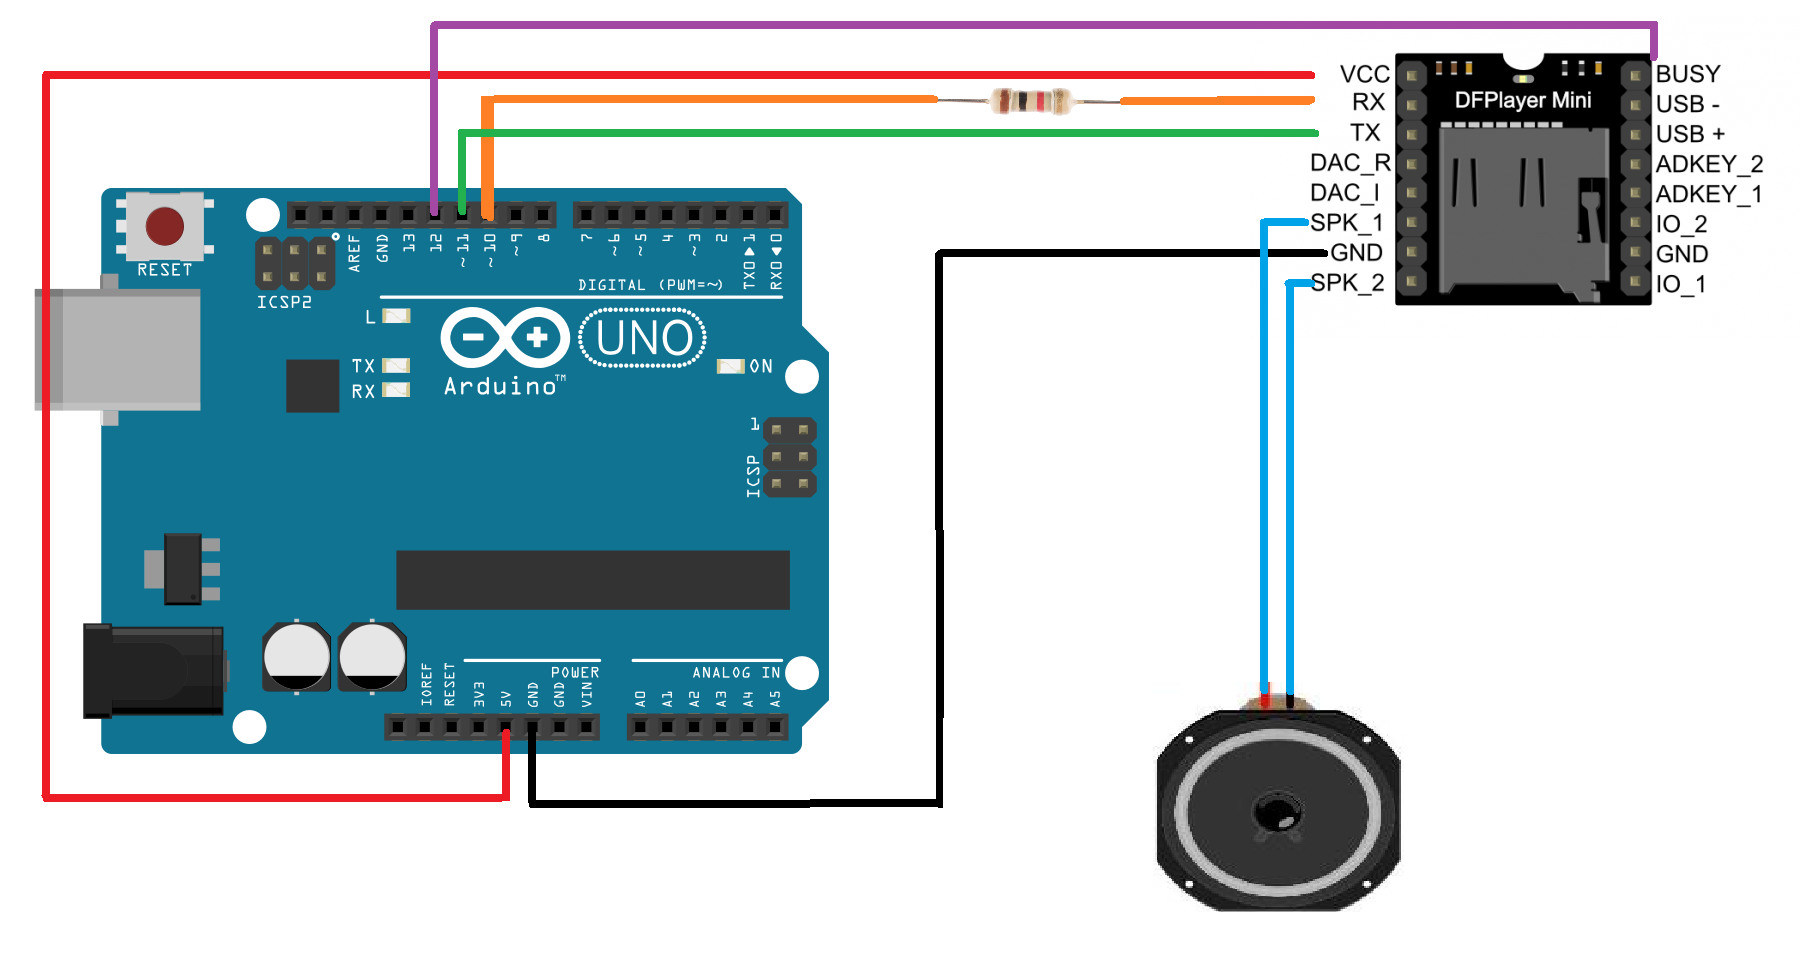
接線圖如下:
有個小重點:因為Arduino要和DFPlayer交換資訊,所以Arduino要用來當TX的腳位必須接在DFPlayer Mini的RX上,反過來,Arduino的RX要接在DFPlayer Mini的TX上,否則沒辦法用。
然後本文使用SoftwareSerial,所以TX和RX可以自己指定,就不侷限在Arduino Uno身上標著TX、RX的Pin 0、1上了,相當方便。
有關DFPlayer Mini的Arduino函式庫相當多(感謝眾網友的點滴灌溉啊),比較常接觸到的為DFRobotDFPlayerMini.h 與 DFPlayerMini_Fast.h 這兩包,今天用前面那一包示範,後面那包雖然號稱可以使用isPlaying()這個函式回傳一組是否正在撥放的Boolean,不過個人發現用「硬」的方式比較直觀,除非腳位很不夠用不然來硬的比較爽,日後再談。
下載好這個函式庫並扔到Arduino IDE後,先打開"GetStarted"這個範例來瞧瞧。
=======<分隔線啦>=======
***************************************************
This example shows the basic function of library for DFPlayer.
Created 2016-12-07
By [Angelo qiao](Angelo.qiao@dfrobot.com)
GNU Lesser General Public License.
See <http://www.gnu.org/licenses/> for details.
All above must be included in any redistribution
****************************************************/
/***********Notice and Trouble shooting***************
1.Connection and Diagram can be found here
<https://www.dfrobot.com/wiki/index.php/DFPlayer_Mini_SKU:DFR0299#Connection_Diagram>
2.This code is tested on Arduino Uno, Leonardo, Mega boards.
****************************************************/
#include "Arduino.h"
#include "SoftwareSerial.h"
#include "DFRobotDFPlayerMini.h"
SoftwareSerial mySoftwareSerial(11, 10); // RX, TX
DFRobotDFPlayerMini myDFPlayer;
void printDetail(uint8_t type, int value);
void setup()
{
mySoftwareSerial.begin(9600);
Serial.begin(115200);
Serial.println();
Serial.println(F("DFRobot DFPlayer Mini Demo"));
Serial.println(F("Initializing DFPlayer ... (May take 3~5 seconds)"));
if (!myDFPlayer.begin(mySoftwareSerial)) { //Use softwareSerial to communicate with mp3.
Serial.println(F("Unable to begin:"));
Serial.println(F("1.Please recheck the connection!"));
Serial.println(F("2.Please insert the SD card!"));
while(true){
delay(0); // Code to compatible with ESP8266 watch dog.
}
}
Serial.println(F("DFPlayer Mini online."));
myDFPlayer.volume(10); //Set volume value. From 0 to 30
myDFPlayer.play(1); //Play the first mp3
}
void loop()
{
static unsigned long timer = millis();
if (millis() - timer > 3000) {
timer = millis();
myDFPlayer.next(); //Play next mp3 every 3 second.
}
if (myDFPlayer.available()) {
printDetail(myDFPlayer.readType(), myDFPlayer.read()); //Print the detail message from DFPlayer to handle different errors and states.
}
}
void printDetail(uint8_t type, int value){
switch (type) {
case TimeOut:
Serial.println(F("Time Out!"));
break;
case WrongStack:
Serial.println(F("Stack Wrong!"));
break;
case DFPlayerCardInserted:
Serial.println(F("Card Inserted!"));
break;
case DFPlayerCardRemoved:
Serial.println(F("Card Removed!"));
break;
case DFPlayerCardOnline:
Serial.println(F("Card Online!"));
break;
case DFPlayerUSBInserted:
Serial.println("USB Inserted!");
break;
case DFPlayerUSBRemoved:
Serial.println("USB Removed!");
break;
case DFPlayerPlayFinished:
Serial.print(F("Number:"));
Serial.print(value);
Serial.println(F(" Play Finished!"));
break;
case DFPlayerError:
Serial.print(F("DFPlayerError:"));
switch (value) {
case Busy:
Serial.println(F("Card not found"));
break;
case Sleeping:
Serial.println(F("Sleeping"));
break;
case SerialWrongStack:
Serial.println(F("Get Wrong Stack"));
break;
case CheckSumNotMatch:
Serial.println(F("Check Sum Not Match"));
break;
case FileIndexOut:
Serial.println(F("File Index Out of Bound"));
break;
case FileMismatch:
Serial.println(F("Cannot Find File"));
break;
case Advertise:
Serial.println(F("In Advertise"));
break;
default:
break;
}
break;
default:
break;
}
}
=======<分隔線啦>=======
由於Software Serial使用了Baud Rate 9600,所以Arduino與PC之間的Serial Port改成Baud Rate 115200,在COM Port監控視窗那邊記得要改Baud Rate,改成115200才會看到即時資訊喔。
這坨東西呢,會每三秒鐘換一首歌來撥放,同時會透過Serial Port發送撥放器即時訊息。
一開始就看這坨,一點都不像Get Started,相信第一次玩的人已經需要呼吸器了。
我們從零開始,介紹幾個最基本會瘋狂用到的指令:
volume()->控制音量,括弧內數值從0~30,代表沒聲音到最大聲。
volumeUp()->增加音量一格,括弧內不用數字就可以用。
volumeDown()->降低音量一格,括弧內不用數字就可以用。
play() ->撥放特定某一首歌一次,括弧裡面為該歌的編號(需為正整數)
loop() ->重複撥放特定某一首歌,括弧裡面為該歌的編號(需為正整數)
next() ->撥放下一首歌,括弧裡面不用指定數字就可以用
所以牛刀小試一下,如果我希望撥放第一首歌一次,我該怎麼寫呢?
=======<分隔線啦>=======
#include "Arduino.h"
#include "SoftwareSerial.h"
#include "DFRobotDFPlayerMini.h"
SoftwareSerial mySoftwareSerial(11, 10); // RX, TX
DFRobotDFPlayerMini myDFPlayer;
void setup()
{
mySoftwareSerial.begin(9600);
Serial.begin(115200);
Serial.println();
Serial.println(F("DFRobot DFPlayer Mini Demo"));
Serial.println(F("Initializing DFPlayer ... (May take 3~5 seconds)"));
if (!myDFPlayer.begin(mySoftwareSerial)) { //Use softwareSerial to communicate with mp3.
Serial.println(F("Unable to begin:"));
Serial.println(F("1.Please recheck the connection!"));
Serial.println(F("2.Please insert the SD card!"));
while(true){
delay(0); // Code to compatible with ESP8266 watch dog.
}
}
Serial.println(F("DFPlayer Mini online."));
myDFPlayer.volume(10); //Set volume value. From 0 to 30
myDFPlayer.play(1); //Play the first mp3
}
void loop()
{
}
=======<分隔線啦>=======
沒了,就這樣?
沒錯,loop()裡面真的什麼都沒有。
那...如果我希望歌曲1和歌曲2輪流放,其他歌都不要呢?
我們來一段經典的錯誤範例
=======<分隔線啦>=======
//This is NOT a workable code.
//Demonstration Only!
#include "Arduino.h"
#include "SoftwareSerial.h"
#include "DFRobotDFPlayerMini.h"
SoftwareSerial mySoftwareSerial(11, 10); // RX, TX
DFRobotDFPlayerMini myDFPlayer;
void setup()
{
mySoftwareSerial.begin(9600);
Serial.begin(115200);
Serial.println();
Serial.println(F("DFRobot DFPlayer Mini Demo"));
Serial.println(F("Initializing DFPlayer ... (May take 3~5 seconds)"));
if (!myDFPlayer.begin(mySoftwareSerial)) { //Use softwareSerial to communicate with mp3.
Serial.println(F("Unable to begin:"));
Serial.println(F("1.Please recheck the connection!"));
Serial.println(F("2.Please insert the SD card!"));
while(true){
delay(0); // Code to compatible with ESP8266 watch dog.
}
}
Serial.println(F("DFPlayer Mini online."));
myDFPlayer.volume(10); //Set volume value. From 0 to 30
}
void loop()
{
myDFPlayer.play(1);
myDFPlayer.play(2);
}
=======<分隔線啦>=======
聰明如你發現什麼問題了嗎?沒錯,完全沒有聲音,直到按下Arduino Uno身上的Reset鈕才會發出聲音一次。這到底是為什麼?
因為void loop()裡面的東西會在每一個CPU Cycle重複被執行,所以上面那段呢,可以視為Arduino拼命地打訊號給DFPlayer Mini,讓它無所適從。
終極概念:只有在想要傳訊息給DFPlayer的時候才傳,其他時間都封印住。
由此可猜,坊間常見的做法是什麼呢?沒錯,就是加上Delay();,看歌有幾秒就Delay幾秒,如下所示,假設0001和0002兩首歌分別為30秒和60秒:
=======<分隔線啦>=======
//Switching Between 2 Songs
#include "Arduino.h"
#include "SoftwareSerial.h"
#include "DFRobotDFPlayerMini.h"
SoftwareSerial mySoftwareSerial(11, 10); // RX, TX
DFRobotDFPlayerMini myDFPlayer;
void setup()
{
mySoftwareSerial.begin(9600);
Serial.begin(115200);
Serial.println();
Serial.println(F("DFRobot DFPlayer Mini Demo"));
Serial.println(F("Initializing DFPlayer ... (May take 3~5 seconds)"));
if (!myDFPlayer.begin(mySoftwareSerial)) { //Use softwareSerial to communicate with mp3.
Serial.println(F("Unable to begin:"));
Serial.println(F("1.Please recheck the connection!"));
Serial.println(F("2.Please insert the SD card!"));
while(true){
delay(0); // Code to compatible with ESP8266 watch dog.
}
}
Serial.println(F("DFPlayer Mini online."));
myDFPlayer.volume(10); //Set volume value. From 0 to 30
}
void loop()
{
myDFPlayer.play(1);
delay(30000);
//The length should be as long as the song itself.
myDFPlayer.play(2);
delay(60000);
}
=======<分隔線啦>=======
大哥,可是這樣我每次要指定撥放某一首歌,同時要讓Arduino做其他事情,有那個Delay不就不行了嗎?況且每次要先算好一首歌有多久,很不科學啊,同時Arduino沒有Threading功能,怎麼辦?
首先介紹比較不科學也不好用的方法,我還是得先知道曲目1和2的總時間長度,在此用3秒鐘和5秒鐘來示範。
概念是這樣:在特定時間內只讓Arduino傳輸一次play指令,這可以用if迴圈構成指標寫法配合系統時間millis()來達成:
=======<分隔線啦>=======
//Demonstration
//Switching Between 2 different songs which are 5 and 3 sec.
#include "Arduino.h"
#include "SoftwareSerial.h"
#include "DFRobotDFPlayerMini.h"
SoftwareSerial mySoftwareSerial(11, 10); // RX, TX
DFRobotDFPlayerMini myDFPlayer;
int index = 1;
int sw = 3000;
void setup()
{
mySoftwareSerial.begin(9600);
Serial.begin(115200);
Serial.println();
Serial.println(F("DFRobot DFPlayer Mini Demo"));
Serial.println(F("Initializing DFPlayer ... (May take 3~5 seconds)"));
if (!myDFPlayer.begin(mySoftwareSerial)) { //Use softwareSerial to communicate with mp3.
Serial.println(F("Unable to begin:"));
Serial.println(F("1.Please recheck the connection!"));
Serial.println(F("2.Please insert the SD card!"));
while(true){
delay(0); // Code to compatible with ESP8266 watch dog.
}
}
Serial.println(F("DFPlayer Mini online."));
myDFPlayer.volume(10); //Set volume value. From 0 to 30
}
void loop()
{
static unsigned long timer = millis();
if (millis() - timer > sw) {
timer = millis();
if (index == 2){
index = 1;
sw = 3000;
Serial.println("Now sw =3000, index = 2");
}
else {
index = 2;
sw = 5000;
Serial.println("Now sw=5000, index = 1");
}
myDFPlayer.play(index);
}
}
=======<分隔線啦>=======
可是這樣還是好麻煩喔,有沒有什麼方式可以知道DFPlayer已經撥完指定的歌曲,執行下一道指令,不會被Delay()給耽誤呢?
當然有,今天要來硬的,來人啊!對DFPlayer用刑!(X
歐不是,請再準備一條杜邦線,DFPlayer mini的VCC腳位對面有一個Busy腳位,平常如果沒事的時候處於HIGH的狀態,反之若正在撥放,會是LOW的狀態。
知道了這點之後,吾人即可指定一隻針腳作為digitalRead()使用,利用if迴圈判斷該腳位是否為LOW,就能知道音樂是不是播完了。這樣就不用去了解歌曲到底有多長了,反正撥放完畢後DFPlayer Mini會主動輸出低電位,是不是很方便呢?
於是乎接線變成這樣:
一樣,用剛剛的範例來改寫:
=======<分隔線啦>=======
//Demonstration
//Switching Between 2 different songs with PIN busy on DFPlayer Mini
#include "Arduino.h"
#include "SoftwareSerial.h"
#include "DFRobotDFPlayerMini.h"
SoftwareSerial mySoftwareSerial(11, 10); // RX, TX
DFRobotDFPlayerMini myDFPlayer;
int index;
void setup()
{
mySoftwareSerial.begin(9600);
Serial.begin(115200);
pinMode(12, INPUT);
//指定PIN12作為INPUT讀取Busy的高低電位 ,並將PIN 12與DFPlayer的Busy腳位連接
Serial.println();
Serial.println(F("DFRobot DFPlayer Mini Demo"));
Serial.println(F("Initializing DFPlayer ... (May take 3~5 seconds)"));
if (!myDFPlayer.begin(mySoftwareSerial)) { //Use softwareSerial to communicate with mp3.
Serial.println(F("Unable to begin:"));
Serial.println(F("1.Please recheck the connection!"));
Serial.println(F("2.Please insert the SD card!"));
while(true){
delay(0); // Code to compatible with ESP8266 watch dog.
}
}
Serial.println(F("DFPlayer Mini online."));
myDFPlayer.volume(10); //Set volume value. From 0 to 30
}
void loop()
{
if (digitalRead(12)==HIGH){
if (index == 1){
myDFPlayer.play(1);
index = 2;
}
else {
myDFPlayer.play(2);
index = 1;
}
}
}
=======<分隔線啦>=======
是不是?
簡單很多齁。
知道了這個就可以做出更多組合了呢!
====更正啟事====
由於上傳圖片後才發現我畫錯了,所以直接改正程式碼RX、TX的部分
原始示範為(10, 11)作為RX、TX
本文以(11, 10)作為RX、TX
特此告知更正,謝謝大家